
I finally found some vintage cane chairs at the thrift store for $4.99 each. There were 4 chairs all in great condition, they had a bit of a wobble, but overall no serious damages. I was also surprised the old cane webbing was still in great shape, not one chair back was ripped! However, it was not the color cane I was looking for so I still had to recane each chair, which I will explain the process in this article of course.
In this cane chair makeover, I am refinishing 4 chairs in total. My plan is to paint the chairs black, add some new cane webbing on the backs, and also reupholster each chair cushion. This is a time-consuming furniture makeover but it’s definitely going to be worth it.
My inspiration for this cane chair furniture makeover is the Nadia Black Cane Chair by CB2, click the link to check out the chair! These chairs by CB2 are beautiful, but they are also $650 CAD per chair, a little over my budget for some dining room chairs. My girlfriend loves them so she gave me the idea and I came up with the process in my head. It was time to get things started.
Getting Started

The very first thing I did when getting ready to work on these chairs is set up a plastic drop cloth. I am working inside my office space for this makeover. so keeping things clean is extremely important. I used painter’s tape to keep the drop cloth up. Also, a quick vacuum before placing the drop cloth up is a great idea to remove dust, this helps a lot when painting. Having dust fall onto you freshly painted surface sucks, trust me.
Cleaning the Chairs
After prepping the area and cleaning up the space we can place the chairs on the dropcloth in the workzone. It is time to clean each chair from top to bottom, but first, we need to remove the old cushions. To do so I simply flipped the chairs on their backs and used a drill to remove the 4 screws holding them in. Just make sure you are using the correct bit size so you do no strip the screw.

After all the cushions have been removed, place them to the side until we start reupholstering them.
Now we can start cleaning the chairs. Grab a clean rag and your degreasing product, I am using Krud Kutter. The reason you want to use a good degreasing cleaner is to truly clean the surface. When applying paint you want the surface to be clean so it adheres as best as possible. I spray one chair at a time all over. I will let the Krud Kutter sit for 15-30 seconds, this lets it do its magic.

I then begin wiping the Krud Kutter away, but I am ensuring each square inch has been wiped. Once you wipe in and away the degreaser you need to do a pass over with a clean rag and some water. We can’t leave the degreaser on the wood, the paint won’t stick on well. Wipe with a damp rag top to bottom. I then use a dry rag to dry off the surface.
Repeat for each chair.
Gluing the Chairs
The chairs needed glue between the cracks throughout. As I mentioned before the only real issue with these chairs is how flimsy they were, they needed some glue to hold them tight. But don’t worry later on I add even more support before we finish up.

I had some pieces of the chair I could completely take apart, while others would barely separate. What I did was take apart what I could, remove old dry glue, sand it smooth and add new glue. I used Gorilla Wood Glue. For the areas I couldn’t remove I used these small tipped containers and squirted glue in the small cracks. Then I pressed them tight and taped them up until they dried.
Removing the Cane
After a good cleaning we can remove the cane from the chair. You can also remove the cane prior to cleaning, I just did it this way because I ended up deciding the cane was to be removed after I cleaned it. This is because the cane webbing would not bleach lighter in color, and oxilic acid also did not lighten the cane. This ruined how I wanted the chairs to look so I decided I was going to remove the cane and add new cane webbing after painting.

Removing cane webbing is simple, here is the DIY process explained:
- Use a utility knife around both the inside and outside of the spline. Be careful not to slip and damage the wood or cut yourself.
- Pry away the spline with a small flat head screwdriver. You can use a special caning chisel, but I didn’t have one, but a small screwdriver worked great.
- Cut the cane and begin peeling it off the chair. I the cane is in bad shape you can rip it away without caring. My cane chairs were in good condition, I decided to cut the edges and save the cane for a future project.
- After removing the cane you need to clean out the glue, pieces of cane, and pieces of spline stuck inside the crevice. This crevice is where the cane webbing is pushed into and glued. It must be cleaned out properly for recaning the chair later on. Again a special chisel can make this process faster, but I used a flat head screwdriver just smaller than the crevice.
- Once you cleaned out the old glue, cane, and spline, I decided to do one more clean-up with a damp rag in the crevice. This ensured any loose piece fell out of the crevice. Then I knew it was ready for regaining later on.

After these 5 steps, I was completely done removing the cane webbing from each chair. It does take some time, if you plan to do this often I recommend getting this caning chisel on Amazon for removing old cane from chairs.
Sanding the Chairs

Since I am painting these chairs black I need to sand these chairs down first. The reason we sand before painting is for:
- Paint adheres better to sanded surfaces, not glossy surfaces.
- Sanding removes any imperfections, scratches, and scuffs, which helps make the chairs look smooth and professional when completed.
To sand the chairs I used 180 grit sandpaper by hand. I scuffed every corner of each chair and I double-checked for scratches and scuff marks throughout. You want to sand in a pattern, try following the wood grain to avoid having scuff marks throughout.
Clean Away the Sanding Dust
Now it is important to clean away the sanding dust. This is super important before paint because we do not want dust under or in our paint. Dust can cause adhering problems and also texture issues. This is something we need to avoid if we want a professional-looking finish.

I use a tack cloth to clean dust from each chair. Tack clothes are great, they have this “tacky” feeling without leaving a sticky residue. It simply grabs the adding dust and provides a great cleaning surface.
You can also use a damp rag too, just do not use too much water as it can potentially swell your wooden furniture.
Painting the Chairs
Typically you would prime your chairs first, but I am using Silk All in One Mineral Paint by Dixie Belle Paint, which is known to have a built-in primer. After using it a few times it seems to adhere pretty well. Since we sanded and cleaned well, the paint will have no trouble holding onto the chairs.

If you still want to prime use a black primer, white is a bad idea under black as any damages you will see the white easily.
To paint the chairs I use a Wooster Shortcut Paintbrush, I love these mini paintbrushes. They always provide a smooth finish and they are lightweight making my hands not cramp up super quickly. This paintbrush gives me the control I want when I am painting furniture.
I dip a small amount of paint on my brush and I begin applying it. My first coat of paint was a thin coat, we do not want to apply a thick first coat. A thin coat helps adhere much better, this prevents peeling and overall provides a more durable piece when it’s all said and done.
I am applying 3 coats in total, sometimes you can get away with 2 coats when using black paint, but since I didn’t prime I could still see some areas that needed that extra coat. Plus having 3 coats of an all in one paint provides better protection.

One thing that is super important is to sand between coats of paint. I use a 220 grit sanding sponge between all coats of paint. This makes the surface smooth and removes any hairs, scratches, and most importantly brush strokes. I do not sand after my final coat of paint because I do not want to risk scratching the surface.
Applying a Clear-Coat Finish for Extra Protection
I know I mentioned I am using an all-in-one paint that has a built-in topcoat, but adding a clear coat is never a bad idea. I decided to use Dixie Belle Satin Clear Coat. I wrapped tinfoil over a bowl and poured some in, then I added a tiny amount of black paint into the clear coat. The reduces the chances of having any cloudy look over the black paint, its a lifesaving tip.

To apply this clear coat I am trying out a new method I have seen used many times. I am using the foam applicator. I was pretty worried about how it would look but it turned out great. I simply drop one side of the applicator in my clear coat finish, then wipe away the excess clear coat on the edges of the bowl, and then I begin wiping it on my painted surface. I think my YouTube video will show you what I mean better than my verbal explanation.
I apply 2 coats of clear coat for extra durability. Chairs see a lot of traffic, extra protection is not a bad idea.
Reupholstering the Chairs
I drove around to multiple fabric shops looking for the black sherpa fabric. This stuff is popular apparently. I ended up getting it at a small fabric shop, it was dark and in a concrete basement. The setting was a little scary, but the young man working was very nice. He cut me a 2 meter piece of fabric and it was only $22 or so, I was happy with that cost.

To reupholster the chairs I had to first remove the old fabric. This was simple, i pulled each staple one by one. I lifted the staple with a flat head screwdriver and pulled them out with pliers. This ended up taking 30 minutes for all 4 chairs. I had to remove 2 piece of fabric for 3 chairs and one for the other. They must have just kept applying the new fabric over the old causing them to pile up.
I kept the original fabric to keep the shape of the foam and save me some time just in case the fabric was damaged.
I then cut my fabric to the correct size, I folded the fabric to the back where I could then staple the fabric tight with a staple gun. I did my best to make sure there were no wrinkles in the corners of the fabric, which I succeeded with!
Recaning the Chair
After the paint has had plenty of time to dry overnight I came back the following day with new cane webbing. This stuff had the same design but was much lighter in color, matching our inspiration design.

If you are wondering how much cane webbing costs I spent $82 on 4 feet of cane webbing and 4 splines. I did not expect it to cost that much but I guess it is what it is, cane webbing is pretty expensive.
Here is how to recane a pressed cane chair:
- Cut the cane into appropriate sizes. Since I had 4 chairs and 4 feet I cut 4 pieces at 1 foot.
- Soak the cane webbing in water for 20-30 minutes. After soaking dry it with a towel.
- Place it over the area it will be installed and trim each edge 1-2 inches past the crevice it will be pressed into. Use sharp scissors.
- Pull strands back to the crevice line but not past the crevice line. Also, pull strands back in the corners too but also not past the corner crevice line. This process makes pressing into the crevice much easier.
- Line up the cane straight.
- Begin pressing the cane into the crevice with a thin tool. I used a wooden spatula, but you can use a metal or plastic one, or a different tool altogether. Some people use wooden wedges.
- Wedge the cane down to keep it from popping out. People use wood wedges but I picked up wooden clothespins and cracked them in half. Worked as a great DIY wedge.
- Before trimming place your spline in water for a minimum of 15 minutes.
- Trim away outside cane using a chisel. Remember to trim the outside so the spline will hold the cane in place.
- Make sure all the trimmed cane is outside of the crevice.
- Add a thin line of glue fully around in the crevice.
- Begin pressing the spline in place. Depending on the crevice size and spline size you may be able to press the spline in by hand at first. If you can’t begin pressing the spline by hand use a rubber mallet to hit it in place initially. I used rubber after I pushed in by hand. Rubber helped protect the paint job, avoid a hammer if doing this on a painted surface.
- Wipe area with a tack cloth.
- Let it dry.

Adding Support L-Brackets
As I mentioned when gluing these chairs, I add more support to keep these chairs in solid condition. I am adding these 2-inch L-brackets to each corner under the seat. This makes these chairs ten times sturdier for a long-lasting future.
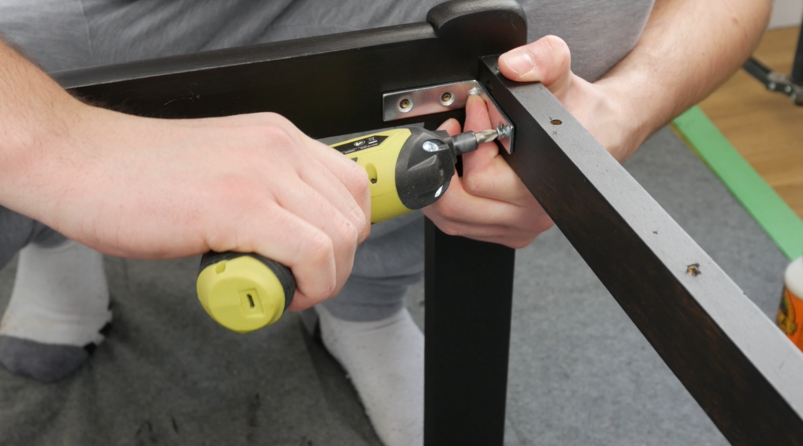
I pre-drilled each hole with a 1/16th bit and added in 1/2 wood screws. These guys were sturdy.
Installing the Cushions

It was finally time for the final step, screwing the newly upholstered cushions back on. I simply grabbed my drill and the baggy of screws I held on to and began screwing each one in. In a matter of 15 minutes, these chairs were completed.

The Final Result

Here is the final result of this cane chair makeover project. I hope you enjoyed the full process of me explaining things step by step in this detailed blog post, but to get the best visual representation I recommend watching the full process on my YouTube channel. The video is available for you to watch it below, let me know what you think by leaving me a comment on that video, and I will do my best to answer your questions.
Cane Chair Furniture Makeover Video
Final Thoughts
I hope you enjoyed this detailed guide I had decided to put together. I had a lot of fun with the project and I really wanted to explain it step by step in words. There’s one thing I really wanted to let you all know is that I was intimidated at first. I thought recaning these chairs would be near impossible, but I was wrong. I watched a few YouTube videos and I figured it out.
So really my point is to not be scared of trying new things during your furniture makeovers, often they are not as difficult as you think.
Good luck with your next furniture flip! – Jamie the Furniture Flippa

